Difference between revisions of "Raspberry Pi"
Plittlefield (talk | contribs) |
Plittlefield (talk | contribs) |
||
| (67 intermediate revisions by 2 users not shown) | |||
| Line 2: | Line 2: | ||
https://www.raspberrypi.org/products | https://www.raspberrypi.org/products | ||
| + | |||
| + | https://rpilocator.com/?country=UK | ||
* [https://www.raspberrypi.org/products/raspberry-pi-4-model-b/ Raspberry Pi 4 Model B] ~ £40 | * [https://www.raspberrypi.org/products/raspberry-pi-4-model-b/ Raspberry Pi 4 Model B] ~ £40 | ||
| Line 10: | Line 12: | ||
* [https://www.raspberrypi.org/products/raspberry-pi-zero-w/ Raspberry Pi Zero W] ~ £15 | * [https://www.raspberrypi.org/products/raspberry-pi-zero-w/ Raspberry Pi Zero W] ~ £15 | ||
* [https://www.raspberrypi.org/products/raspberry-pi-zero/ Raspberry Pi Zero] ~ £11 | * [https://www.raspberrypi.org/products/raspberry-pi-zero/ Raspberry Pi Zero] ~ £11 | ||
| + | |||
| + | '''Compute Module 4''' | ||
| + | |||
| + | https://www.raspberrypi.com/products/compute-module-4/?variant=raspberry-pi-cm4001000 | ||
| + | |||
| + | https://www.interelectronix.com/installing-raspberry-pi-os-raspberry-compute-module-4.html | ||
| + | |||
| + | https://www.waveshare.com/wiki/Compute-Module-4 | ||
| + | |||
| + | [https://shop.pimoroni.com/search?q=Raspberry%20Pi%20Compute%20Module%204&product_type=Raspberry%20Pi Raspberry Pi Compute Module 4] | ||
| + | |||
| + | [https://shop.pimoroni.com/products/raspberry-pi-compute-module-4-io-board?variant=32280572002387 Raspberry Pi Compute Module 4 IO Board] | ||
== Purchase == | == Purchase == | ||
| + | |||
| + | https://rpilocator.com/?country=UK | ||
=== Power Supply with On Off Switch === | === Power Supply with On Off Switch === | ||
| Line 26: | Line 42: | ||
* Green: https://goo.gl/XRn7Gb | * Green: https://goo.gl/XRn7Gb | ||
* White: https://goo.gl/H8kWZr | * White: https://goo.gl/H8kWZr | ||
| + | |||
| + | === Desktop Cases and Kits === | ||
| + | |||
| + | https://deskpi.com/collections/deskpi-lite/products/new-deskpi-lite-set-top-box-for-raspberry-pi-4 | ||
== Downloads == | == Downloads == | ||
| Line 32: | Line 52: | ||
[https://dietpi.com/downloads/images/ DietPi] | [https://dietpi.com/downloads/images/ DietPi] | ||
| + | |||
| + | [https://pibakery.org/ PiBakery] | ||
== Installation - Ubuntu 14.04 LTS == | == Installation - Ubuntu 14.04 LTS == | ||
| Line 74: | Line 96: | ||
The first screen on boot up gives you various options, one of which is to resize the OS to use all of the SD-Card. Do this, then set keyboard, locale etc continue through until you are at a point where you can reboot the system. | The first screen on boot up gives you various options, one of which is to resize the OS to use all of the SD-Card. Do this, then set keyboard, locale etc continue through until you are at a point where you can reboot the system. | ||
| + | |||
| + | == '''PiVPN''' == | ||
| + | |||
| + | * [https://www.raspberrypi.com/software/operating-systems/ Raspbian OS 32-Bit Lite] | ||
| + | * [https://pivpn.io PiVPN] | ||
| + | * [https://www.wundertech.net/openvpn-raspberry-pi-setup-instructions/ Helpful Guide] | ||
== '''HOWTO: MODIFY:''' == | == '''HOWTO: MODIFY:''' == | ||
| + | |||
| + | === Disable LOADS IN ONE GO === | ||
| + | |||
| + | Towards the bottom of this page ... | ||
| + | |||
| + | https://www.cnx-software.com/2021/12/09/raspberry-pi-zero-2-w-power-consumption/ | ||
| + | |||
| + | '''Lowering Raspberry Pi Zero 2 W power consumption''' | ||
| + | |||
| + | Let go back to the Raspberry Pi OS Lite image with only UART and SSH enabled and nothing else at 125 mA idled. We’ll make some modifications to try to lower the power consumption mostly via raspi-config utility and editing '''config.txt'''. | ||
| + | |||
| + | Let’s force Raspberry Pi RP3A0 to 600 MHz. | ||
| + | |||
| + | arm_freq=600 | ||
| + | |||
| + | I don’t expect improvements here while idle… and indeed we’ve got 127 mA somehow. Let’s disable the GPU completely by setting the memory to 16: | ||
| + | |||
| + | gpu_mem=16 | ||
| + | |||
| + | Still 127 mA on average at idle…. | ||
| + | |||
| + | We can disable LED in theory by adding the following lines in '''config.txt''': | ||
| + | |||
| + | # Disable the ACT LED on the Pi Zero. | ||
| + | dtparam=act_led_trigger=none | ||
| + | dtparam=act_led_activelow=on | ||
| + | |||
| + | But it’s not working for me whether I set the second line to off or on. But I can turn off the LED manually from the command line: | ||
| + | |||
| + | $ echo none | sudo tee /sys/class/leds/led0/trigger | ||
| + | $ echo 1 | sudo tee /sys/class/leds/led0/brightness | ||
| + | |||
| + | It shaves 1mA to 126 mA, or about 5mW. What’s very odd is that sometimes I have to run the following instead to turn the LED off: | ||
| + | |||
| + | $ echo 0 | sudo tee /sys/class/leds/led0/brightness | ||
| + | |||
| + | Let’s now disable audio, WiFi and Bluetooth, and camera/display auto detects in '''config.txt''': | ||
| + | |||
| + | # Disable audio (loads snd_bcm2835) | ||
| + | dtparam=audio=off | ||
| + | dtoverlay=disable-bt | ||
| + | dtoverlay=disable-wifi | ||
| + | |||
| + | # Automatically stop overlays for detected cameras | ||
| + | camera_auto_detect=0 | ||
| + | |||
| + | # Automatically stop overlays for detected DSI displays | ||
| + | display_auto_detect=0 | ||
| + | |||
| + | We are down to 114 mA, instead of 125 mA when we first ran the image without modifications, i.e. default settings including no WiFi, but SSH and UART enabled. That’s a small saving of 9 mA. | ||
| + | |||
| + | Another trick is to disable HDMI with the following command: | ||
| + | |||
| + | /usr/bin/tvservice -o | ||
| + | |||
| + | But it’s not working apparently because of the new standard KMS video driver for 3D graphics in Raspberry Pi OS Bullseye: | ||
| + | |||
| + | /usr/bin/tvservice -o | ||
| + | /usr/bin/tvservice is not supported when using the vc4-kms-v3d driver. | ||
| + | |||
| + | Similar features are available with standard linux tools such as modetest from libdrm-tests. | ||
| + | |||
| + | We can go to raspi-config to change that, namely in "Advanced options->GL driver", where it will install some packages, and then we can select "G1 Legacy". | ||
| + | |||
| + | raspi-config G1 Legacy | ||
| + | |||
| + | It will change '''config.txt''' from: | ||
| + | |||
| + | # Enable DRM VC4 V3D driver | ||
| + | dtoverlay=vc4-kms-v3d | ||
| + | max_framebuffers=2 | ||
| + | |||
| + | to | ||
| + | |||
| + | # Enable DRM VC4 V3D driver | ||
| + | #dtoverlay=vc4-kms-v3d | ||
| + | max_framebuffers=2 | ||
| + | |||
| + | Now we are talking! The power consumption went down to 92.7mA, or about 21mA less, and we’ve yet to disable HDMI output: | ||
| + | |||
| + | /usr/bin/tvservice -o | ||
| + | |||
| + | '''Powering off HDMI''' | ||
| + | |||
| + | That’s down to 75.5 mA, another ~17 mA. If you want to disable HDMI automatically at boot time add the line to '''/etc/rc.local''' file. That’s also where I ended up turning off the LED (just don’t ask me why I don’t need to run the line to set it to 0 or 1): | ||
| + | |||
| + | # Print the IP address | ||
| + | _IP=$(hostname -I) || true | ||
| + | if [ "$_IP" ]; then | ||
| + | printf "My IP address is %s\n" "$_IP" | ||
| + | fi | ||
| + | /usr/bin/tvservice -o | ||
| + | echo none | sudo tee /sys/class/leds/led0/trigger | ||
| + | |||
| + | exit 0 | ||
| + | |||
| + | We’ve got one more trick that will probably not lower idle power consumption much, but Jeff Geerlink provided instructions to disable cores, so let’s modify /boot/cmdline.txt to limit the number of cores to one with maxcpus=1: | ||
| + | |||
| + | console=serial0,115200 console=tty1 '''maxcpus=1''' root=PARTUUID=9105aa44-02 rootfstype=ext4 fsck.repair=yes rootwait | ||
| + | |||
| + | === Disable CPU Cores === | ||
| + | |||
| + | Add the following to your <code>/boot/cmdline.txt</code> | ||
| + | |||
| + | maxcpus=1 | ||
=== HDMI Output === | === HDMI Output === | ||
| Line 88: | Line 221: | ||
https://www.childs.be/blog/post/raspberry-pi-3-hdmi-overscan-settings-and-how-to-correct-them | https://www.childs.be/blog/post/raspberry-pi-3-hdmi-overscan-settings-and-how-to-correct-them | ||
| + | |||
| + | === Disable Bluetooth === | ||
| + | |||
| + | Edit the config file ... | ||
| + | |||
| + | sudo nano /boot/config.txt | ||
| + | |||
| + | # Disable Bluetooth | ||
| + | dtoverlay=disable-bt | ||
| + | |||
| + | Then disable system services ... | ||
| + | |||
| + | sudo systemctl disable hciuart.service | ||
| + | sudo systemctl disable bluealsa.service | ||
| + | sudo systemctl disable bluetooth.service | ||
| + | |||
| + | Then reboot to apply the changes ... | ||
| + | |||
| + | sudo reboot | ||
| + | |||
| + | === Disable Audio === | ||
| + | |||
| + | |||
=== Tweaks === | === Tweaks === | ||
| Line 166: | Line 322: | ||
== '''INFO''' == | == '''INFO''' == | ||
| + | |||
| + | neofetch | ||
| + | |||
| + | === Verify Network Interface Card NIC Speed === | ||
| + | |||
| + | sudo ethtool eth0 | grep Speed | ||
=== Default Username & Password - Debian === | === Default Username & Password - Debian === | ||
| Line 195: | Line 357: | ||
== '''HOWTO: INSTALL''' == | == '''HOWTO: INSTALL''' == | ||
| + | |||
| + | === Docker === | ||
| + | |||
| + | ==== Engine ==== | ||
| + | |||
| + | sudo -i | ||
| + | curl -sSL <nowiki>https://get.docker.com</nowiki> | sh | ||
| + | sudo usermod -aG docker username | ||
| + | sudo reboot | ||
| + | docker version | ||
| + | docker run hello-world | ||
| + | |||
| + | ==== Portainer ==== | ||
| + | |||
| + | sudo docker pull portainer/portainer-ce:latest | ||
| + | sudo docker run -d -p 9000:9000 --name=portainer --restart=always -v /var/run/docker.sock:/var/run/docker.sock -v portainer_data:/data portainer/portainer-ce:latest | ||
| + | |||
| + | === SMART Monitoring Tools Without Dependencies === | ||
| + | |||
| + | sudo apt-get -y install --no-install-recommends smartmontools | ||
=== FFMPEG with GPU support for Raspberry Pi === | === FFMPEG with GPU support for Raspberry Pi === | ||
| Line 282: | Line 464: | ||
== '''HOWTO: INFO''' == | == '''HOWTO: INFO''' == | ||
| + | |||
| + | === Boot from NVMe === | ||
| + | |||
| + | * Make sd card with pi desktop | ||
| + | * Boot and run apt update and reboot | ||
| + | * Run eprom update and reboot | ||
| + | * Tweak pci gen 3 and reboot | ||
| + | * Download umbrelos | ||
| + | * Run imager and choose nvme for umbrelos | ||
| + | * Run raspi config advanced boot order nvme | ||
| + | * Boot umbrelos on nvme | ||
| + | |||
| + | === Disk Imager === | ||
| + | |||
| + | ==== Releases ==== | ||
| + | |||
| + | https://github.com/raspberrypi/rpi-imager/releases | ||
| + | |||
| + | ==== Advanced Settings ==== | ||
| + | |||
| + | Press the cog wheel when you are creating an SD card and you can set:- | ||
| + | |||
| + | * hostname | ||
| + | * root password | ||
| + | * ssh service autostart | ||
| + | * wifi details | ||
| + | |||
| + | === Disk Speed Tests === | ||
| + | |||
| + | sudo curl <nowiki>https://raw.githubusercontent.com/TheRemote/PiBenchmarks/master/Storage.sh</nowiki> | sudo bash | ||
| + | |||
| + | https://jamesachambers.com/raspberry-pi-storage-benchmarks-2019-benchmarking-script/ | ||
| + | |||
| + | === Change Boot Order === | ||
| + | |||
| + | # sudo raspi-config | ||
| + | # Advanced | ||
| + | # Boot Order | ||
| + | |||
| + | '''Important - you need to REBOOT now, and not just shutdown.''' | ||
| + | |||
| + | === PiKVM === | ||
| + | |||
| + | A very simple and fully functional Raspberry Pi-based KVM over IP that you can make with your own hands without any soldering! | ||
| + | |||
| + | This device helps to manage servers or workstations remotely, regardless of the health of the operating system or whether one is installed. You can fix any problem, configure the BIOS, and even reinstall the OS using the virtual CD-ROM or Flash Drive. | ||
| + | |||
| + | https://pikvm.org/ | ||
| + | |||
| + | https://github.com/pikvm/pikvm#diy-getting-started | ||
| + | |||
| + | === Screen Resolution === | ||
| + | |||
| + | View current console resolution - probably frame buffer... | ||
| + | |||
| + | fbset | ||
| + | |||
| + | How to set in various methods... | ||
| + | |||
| + | https://pimylifeup.com/raspberry-pi-screen-resolution/ | ||
=== Power Supply Usage === | === Power Supply Usage === | ||
| Line 298: | Line 540: | ||
[https://www.ebay.co.uk/itm/224272667525 3.5" 320*480 TFT Touch Screen LCD Display Case For Raspberry Pi A B A+ 2B3B3B PM] | [https://www.ebay.co.uk/itm/224272667525 3.5" 320*480 TFT Touch Screen LCD Display Case For Raspberry Pi A B A+ 2B3B3B PM] | ||
| + | |||
| + | [http://lcdwiki.com/3.5inch_RPi_Display Wiki] | ||
[https://www.youtube.com/watch?v=6cjE7CnHonI Driver Setup Video] | [https://www.youtube.com/watch?v=6cjE7CnHonI Driver Setup Video] | ||
| Line 321: | Line 565: | ||
https://gist.github.com/ecampidoglio/5009512 | https://gist.github.com/ecampidoglio/5009512 | ||
| + | |||
| + | === Run Script On Boot === | ||
| + | |||
| + | https://wiki.indie-it.com/wiki/Ubuntu_Server#Enable_.2Fetc.2Frc.local_on_Ubuntu_20.04 | ||
| + | |||
| + | ...and then use this for your /etc/rc.local file... | ||
| + | |||
| + | #!/bin/sh -e | ||
| + | |||
| + | # Make sure the SSH host keys have been generated | ||
| + | ssh-keygen -A | ||
| + | |||
| + | # Disable wifi power management | ||
| + | if [ "$(ip address | grep wlan)" ]; then | ||
| + | iwconfig wlan0 power off | ||
| + | fi | ||
| + | |||
| + | # sleep for 60 seconds to wait for network | ||
| + | /usr/bin/sleep 60s | ||
| + | |||
| + | # send push message on boot | ||
| + | /usr/bin/curl -s --form-string "token=xxxxxxxxxxxxxxxx" --form-string "user=xxxxxxxxxxxxxxxxxxx" --form-string "title=`hostname -f`" --form-string "message=has booted with IP address `hostname -I`" <nowiki>https://api.pushover.net/1/messages.json</nowiki> &>/dev/null | ||
| + | |||
| + | # send email on boot | ||
| + | /usr/bin/echo "booted with IP address `hostname -I`" | /usr/bin/mail -s "`hostname -f`" me@mydomain.co.uk | ||
| + | |||
| + | # exit | ||
| + | exit 0; | ||
=== Run Script On Boot with DietPi === | === Run Script On Boot with DietPi === | ||
To run a script on boot, you have plenty possibilities. If you are not too experienced, you can simply put it into '''/var/lib/dietpi/postboot.d'''. The DietPi boot scripts will execute it automatically with root permissions then, once the boot process has fully finished, thus network is assured, but BEFORE login/outside the login shell. | To run a script on boot, you have plenty possibilities. If you are not too experienced, you can simply put it into '''/var/lib/dietpi/postboot.d'''. The DietPi boot scripts will execute it automatically with root permissions then, once the boot process has fully finished, thus network is assured, but BEFORE login/outside the login shell. | ||
| + | |||
| + | === Upgrade DietPi to Later Debian Bullseye === | ||
| + | |||
| + | https://dietpi.com/blog/?p=811 | ||
| + | |||
| + | === Change User Passswords on DietPi === | ||
| + | |||
| + | dietpi-config > 6 : Security Options > 1 : Change Passwords | ||
=== Change SSH Server from Dropbear to OpenSSH === | === Change SSH Server from Dropbear to OpenSSH === | ||
| Line 335: | Line 615: | ||
sudo vcgencmd measure_temp | sudo vcgencmd measure_temp | ||
| + | |||
| + | === Overclock === | ||
| + | |||
| + | https://www.zdnet.com/article/how-to-overclock-and-stress-test-your-raspberry-pi/ | ||
| + | |||
| + | === Stress Test === | ||
| + | |||
| + | https://www.zdnet.com/article/how-to-overclock-and-stress-test-your-raspberry-pi/ | ||
=== Model === | === Model === | ||
MODEL=$(tr -d '\0' </proc/device-tree/model); echo "$MODEL" | MODEL=$(tr -d '\0' </proc/device-tree/model); echo "$MODEL" | ||
| + | |||
| + | === Display === | ||
| + | |||
| + | Check HDMI Port | ||
| + | |||
| + | tvservice -n | ||
| + | |||
| + | https://raspberrypi.stackexchange.com/questions/46153/detect-hdmi-and-start-gui | ||
=== Discovery === | === Discovery === | ||
| Line 348: | Line 644: | ||
$ arp -a | grep -i "b8:27:eb\|dc:a6:32" | $ arp -a | grep -i "b8:27:eb\|dc:a6:32" | ||
| − | $ sudo nmap -sP -r -n 192.168. | + | $ sudo nmap -sP -r -n 192.168.0.0/24 | egrep -i "b8:27:eb|dc:a6:32|d8:3a:dd" -B2 |
https://www.shellhacks.com/find-raspberry-pi-ip-on-network-windows-macos-linux/ | https://www.shellhacks.com/find-raspberry-pi-ip-on-network-windows-macos-linux/ | ||
| Line 428: | Line 724: | ||
https://github.com/Drewsif/PiShrink | https://github.com/Drewsif/PiShrink | ||
| − | wget https://raw.githubusercontent.com/Drewsif/PiShrink/master/pishrink.sh | + | wget <nowiki>https://raw.githubusercontent.com/Drewsif/PiShrink/master/pishrink.sh</nowiki> |
chmod +x pishrink.sh | chmod +x pishrink.sh | ||
sudo mv pishrink.sh /usr/local/bin | sudo mv pishrink.sh /usr/local/bin | ||
| Line 546: | Line 842: | ||
=== Digital Signage === | === Digital Signage === | ||
| + | * [https://info-beamer.com/ Info Beamer] | ||
| + | * [https://pisignage.com/ piSinage] | ||
* [https://www.yodeck.com YoDeck] | * [https://www.yodeck.com YoDeck] | ||
* [https://www.risevision.com Rise Vision] | * [https://www.risevision.com Rise Vision] | ||
==== Screenly ==== | ==== Screenly ==== | ||
| + | |||
| + | The free Open Source Edition (OSE) is now called '''[https://anthias.screenly.io/ Anthias]''' and has a new web site! | ||
| + | |||
| + | [https://github.com/Screenly/Anthias#installing-on-raspbianraspberry-pi-os Installing on Raspbian/Raspberry Pi OS] | ||
| + | |||
| + | You can also burn an SD card directly from the Raspberry Pi Imager under 'Other specific-purpose OS' :-) | ||
| + | |||
| + | '''Installation''' | ||
| + | |||
| + | * install [https://www.raspberrypi.org/software/operating-systems/ Raspberry Pi OS Desktop] | ||
| + | * run <code>sudo raspi-config</code> and change System Settings > Boot Console + auto login pi user | ||
| + | * configure console font with <code>sudo dpkg-reconfigure console-setup</code> for Terminus 16x32 - check <code>/etc/default/console-setup</code> | ||
| + | * reboot to check font size | ||
| + | * run command to install Screenly and reboot... | ||
| + | |||
| + | bash <(curl -sL <nowiki>https://www.screenly.io/install-ose.sh</nowiki>) | ||
| + | |||
| + | # Do you wish to continue > Y | ||
| + | # Press 1 for the Production Branch | ||
| + | # Do you want Screenly to manage your network > N | ||
| + | # Do you wish to perform a full system upgrade > N | ||
| + | # Reboot | ||
| + | |||
| + | '''Fix WiFi''' | ||
| + | |||
| + | LATEST - September 2021 | ||
| + | |||
| + | It should be using wpa_supplicant, so just edit your <code>/etc/wpa_supplicant/wpa_supplicant.conf</code> file to change the wireless network you want to connect to and make sure you disable the Screenly 'wifi-connect.service' from systemd, then reboot. | ||
| + | |||
| + | sudo systemctl disable wifi-connect.service | ||
| + | sudo nano /etc/wpa_supplicant/wpa_supplicant.conf | ||
| + | |||
| + | ctrl_interface=DIR=/var/run/wpa_supplicant GROUP=netdev | ||
| + | update_config=1 | ||
| + | country=GB | ||
| + | network={ | ||
| + | ssid="first_ssid" | ||
| + | psk="myPass" | ||
| + | key_mgmt=WPA-PSK | ||
| + | '''scan_ssid=1''' | ||
| + | } | ||
| + | network={ | ||
| + | ssid="2NS_SSID" | ||
| + | psk="passw0rd" | ||
| + | key_mgmt=WPA-PSK | ||
| + | } | ||
| + | |||
| + | sudo reboot | ||
| + | |||
| + | |||
| + | OLD | ||
| + | |||
| + | You have to disable the screenly 'wifi-connect' service, then use Network Manager to setup the wifi, then enable the 'wifi-connect' service again. Madness. This is because the wifi-connect service disables the use of the wireless chip. | ||
| + | |||
| + | sudo systemctl disable wifi-connect.service | ||
| + | sudo reboot | ||
| + | sudo nmcli device wifi rescan | ||
| + | sudo nmcli device wifi list | ||
| + | sudo nmcli device wifi connect SSID-Name password wireless-password hidden yes | ||
| + | sudo iwconfig | ||
| + | sudo ipconfig | ||
| + | sudo reboot | ||
| + | sudo systemctl enable wifi-connect.service | ||
| + | sudo reboot | ||
| + | |||
| + | https://github.com/screenly/screenly-ose | ||
https://www.screenly.io/ose/ | https://www.screenly.io/ose/ | ||
| Line 598: | Line 962: | ||
https://www.howtoforge.com/tutorial/how-to-start-a-vnc-server-for-the-actual-display-scraping-with-tigervnc/ | https://www.howtoforge.com/tutorial/how-to-start-a-vnc-server-for-the-actual-display-scraping-with-tigervnc/ | ||
| + | |||
| + | '''Via SSH''' | ||
| + | |||
| + | [[File:Vnc via ssh.jpg]] | ||
| + | |||
| + | ssh user@remoteserver -L 5901:127.0.0.1:5901 | ||
| + | vinagre vnc://127.0.0.1:5901 | ||
| + | |||
| + | https://www.cyberciti.biz/faq/install-and-configure-tigervnc-server-on-ubuntu-18-04/ | ||
=== Virtual Desktop === | === Virtual Desktop === | ||
| Line 624: | Line 997: | ||
Thanks - https://www.danpurdy.co.uk/web-development/raspberry-pi-kiosk-screen-tutorial/ | Thanks - https://www.danpurdy.co.uk/web-development/raspberry-pi-kiosk-screen-tutorial/ | ||
| + | |||
| + | ==== Fix Chromium Browser Error - Profile In Use ==== | ||
| + | |||
| + | rm -rfv .config/chromium/Singleton* | ||
| + | sudo reboot | ||
==== Close Chromium Browser When In Kiosk Mode ==== | ==== Close Chromium Browser When In Kiosk Mode ==== | ||
| Line 667: | Line 1,045: | ||
=== Looping Video Playlist With Omxplayer === | === Looping Video Playlist With Omxplayer === | ||
| − | omxplayer - http://elinux.org/Omxplayer | + | omxplayer - <nowiki>http://elinux.org/Omxplayer</nowiki> |
'''Python Script''' | '''Python Script''' | ||
| Line 873: | Line 1,251: | ||
== '''HOWTO: ALTER:''' == | == '''HOWTO: ALTER:''' == | ||
| + | |||
| + | === Disable PULSEAUDIO === | ||
| + | |||
| + | Disabling the service doesn't work. You have to also mask it. Run these commands as the regular user 'pi'. | ||
| + | |||
| + | systemctl --user stop pulseaudio.socket | ||
| + | systemctl --user stop pulseaudio.service | ||
| + | systemctl --user disable pulseaudio.socket | ||
| + | systemctl --user disable pulseaudio.service | ||
| + | systemctl --user mask pulseaudio.socket | ||
| + | systemctl --user mask pulseaudio.service | ||
| + | |||
| + | === EEPROM === | ||
| + | |||
| + | The Eeprom handles the initial boot process and updates are made to fix bugs and make improvements. | ||
| + | |||
| + | For example, the ability to boot from USB or NVMe drives. | ||
| + | |||
| + | You can check whether any updates are available for install by running the following command ... | ||
| + | |||
| + | sudo rpi-eeprom-update | ||
| + | |||
| + | If any available update is there, you can give the following command to update Raspberry Pi EEPROM ... | ||
| + | |||
| + | sudo rpi-eeprom-update -a | ||
| + | |||
| + | After updating the bootloader, you need to restart your device to apply the changes ... | ||
| + | |||
| + | sudo reboot | ||
=== Disable Quiet Boot === | === Disable Quiet Boot === | ||
| Line 882: | Line 1,289: | ||
=== Get Proper Flashing Cursor Prompt In Terminal === | === Get Proper Flashing Cursor Prompt In Terminal === | ||
| − | Edit the /boot/cmdline.txt file and remove the entry '''vt.global_cursor_default=0''' from the boot line. | + | Edit the <code>/boot/cmdline.txt</code> file and remove the entry '''vt.global_cursor_default=0''' from the boot line. |
| + | |||
| + | console=serial0,115200 console=tty1 root=PARTUUID=c44fbb7c-02 rootfstype=ext4 elevator=deadline fsck.repair=yes rootwait quiet splash plymouth.ignore-serial-consoles '''vt.global_cursor_default=0''' quiet init=/lib/systemd/systemd net.ifnames=0 | ||
=== Disable Bluetooth === | === Disable Bluetooth === | ||
| Line 914: | Line 1,323: | ||
=== Disable IPv6 === | === Disable IPv6 === | ||
| + | |||
| + | Edit ''/etc/sysctl.conf'' and add these lines to the end ... | ||
| + | |||
| + | net.ipv6.conf.all.disable_ipv6 = 1 | ||
| + | net.ipv6.conf.default.disable_ipv6 = 1 | ||
| + | net.ipv6.conf.lo.disable_ipv6 = 1 | ||
| + | net.ipv6.conf.wlan0.disable_ipv6 = 1 | ||
| + | |||
| + | Edit ''/etc/rc.local'' and add this on a line just before the 'exit 0' ... | ||
| + | |||
| + | service procps force-restart | ||
| + | |||
| + | The, reboot ... | ||
| + | |||
| + | sudo reboot | ||
https://cwesystems.com/?p=231 | https://cwesystems.com/?p=231 | ||
| Line 1,006: | Line 1,430: | ||
== '''HOWTO: FIX:''' == | == '''HOWTO: FIX:''' == | ||
| + | |||
| + | === Blank Screen After Boot === | ||
| + | |||
| + | Take out the SD Card or SSD and mount it somewhere. | ||
| + | |||
| + | Edit the <code>/boot/config.txt</code> file and uncomment the line ... | ||
| + | |||
| + | hdmi_force_hotplug | ||
| + | |||
| + | ... then unmount the drive, attach it back to the Pi and boot up. | ||
| + | |||
| + | https://www.reddit.com/r/raspberry_pi/comments/okj33r/solved_raspberry_pi_4_boots_to_black_screen/ | ||
| + | |||
| + | === wifi wlan0 unavailable === | ||
| + | |||
| + | Use wpa_cli to scan and connect to a wireless network, then setup a standard wpa_supplicant.conf file. | ||
| + | |||
| + | https://unix.stackexchange.com/questions/458406/network-manager-works-but-wlan-is-unavailable-for-nmcli | ||
| + | |||
| + | pi@raspberrypi:~ $ sudo wpa_cli -i wlan0 | ||
| + | wpa_cli v2.8-devel | ||
| + | Copyright (c) 2004-2019, Jouni Malinen <j@w1.fi> and contributors | ||
| + | This software may be distributed under the terms of the BSD license. | ||
| + | See README for more details. | ||
| + | |||
| + | Interactive mode | ||
| + | |||
| + | > ADD_NETWORK | ||
| + | 0 | ||
| + | > SET_NETWORK 0 ssid "MYWIFI" | ||
| + | OK | ||
| + | > SET_NETWORK 0 psk "mYpAsshrase" | ||
| + | OK | ||
| + | > ENABLE_NETWORK 0 | ||
| + | OK | ||
| + | <3>CTRL-EVENT-SCAN-STARTED | ||
| + | <3>CTRL-EVENT-SCAN-RESULTS | ||
| + | <3>Trying to associate with SSID 'SMITH3' | ||
| + | > quit | ||
| + | |||
| + | iwconfig | ||
| + | ifconfig | ||
| + | sudo wpa_cli -i wlan0 LIST_NETWORKS | ||
| + | |||
| + | To make this permanent, edit the <code>/etc/wpa_supplicant/wpa_supplicant.conf</code> file and add the lines with your wireless network settings to match. | ||
| + | |||
| + | country=gb | ||
| + | update_config=1 | ||
| + | ctrl_interface=/var/run/wpa_supplicant | ||
| + | network={ | ||
| + | scan_ssid=1 | ||
| + | ssid="MyNetworkSSID" | ||
| + | psk="Pa55w0rd1234" | ||
| + | } | ||
| + | |||
| + | If a wpa_supplicant.conf file is placed into the /boot/ directory, this will be moved to the /etc/wpa_supplicant/ directory the next time the system is booted, overwriting the network settings; this allows a Wifi configuration to be preloaded onto a card from a Windows or other machine that can only see the boot partition. | ||
=== OMX Player ERROR: Raspberry Pi COMXAudio::Decode Timeout === | === OMX Player ERROR: Raspberry Pi COMXAudio::Decode Timeout === | ||
| Line 1,036: | Line 1,516: | ||
== '''Hardware Addons''' == | == '''Hardware Addons''' == | ||
| + | |||
| + | [https://www.okdo.com/getting-started/get-started-with-google-coral-and-raspberry-pi/ Coral TPU AI] - The Coral USB Accelerator from Google is a tiny Edge TPU coprocessor optimised to run TensorFlow Lite, adding powerful AI capabilities to many different host systems, including Raspberry Pi. | ||
[https://www.hifiberry.com/products/digiplus HiFiBerry] - The HiFiBerry Digi+ is a high-quality S/PDIF output board for the Raspberry Pi. It comes in three different versions, compatible with different Raspberry Pis. The dedicated S/PDIF interface chip supports up to 192kHz/24bit resolution. This will enable you to have DTS passthrough on Plex or Kodi or OpenElec. | [https://www.hifiberry.com/products/digiplus HiFiBerry] - The HiFiBerry Digi+ is a high-quality S/PDIF output board for the Raspberry Pi. It comes in three different versions, compatible with different Raspberry Pis. The dedicated S/PDIF interface chip supports up to 192kHz/24bit resolution. This will enable you to have DTS passthrough on Plex or Kodi or OpenElec. | ||
| − | |||
| − | |||
[[Category: Hardware]] | [[Category: Hardware]] | ||
| + | [[Category: Linux]] | ||
Latest revision as of 08:59, 10 April 2024
Products
https://www.raspberrypi.org/products
https://rpilocator.com/?country=UK
- Raspberry Pi 4 Model B ~ £40
- Raspberry Pi 3 Model B+ ~ £35
- Raspberry Pi 3 Model B ~ £30
- Raspberry Pi 2 Model B ~ £20
- Raspberry Pi 1 Model B ~ £17
- Raspberry Pi Zero W ~ £15
- Raspberry Pi Zero ~ £11
Compute Module 4
https://www.raspberrypi.com/products/compute-module-4/?variant=raspberry-pi-cm4001000
https://www.interelectronix.com/installing-raspberry-pi-os-raspberry-compute-module-4.html
https://www.waveshare.com/wiki/Compute-Module-4
Raspberry Pi Compute Module 4 IO Board
Purchase
https://rpilocator.com/?country=UK
Power Supply with On Off Switch
https://www.amazon.co.uk/NorthPada-Raspberry-Tinker-Charger-Adapter/dp/B07MLZQXS7
Starter Kit
- Raspberry Pi 3 Official Desktop Starter Kit (16Gb, Black): https://goo.gl/7u1S7Q
VESA Mounting Case
- Black: https://goo.gl/gX3wY9
- Green: https://goo.gl/XRn7Gb
- White: https://goo.gl/H8kWZr
Desktop Cases and Kits
https://deskpi.com/collections/deskpi-lite/products/new-deskpi-lite-set-top-box-for-raspberry-pi-4
Downloads
Installation - Ubuntu 14.04 LTS
NOTE: The following is only applicable to the Raspberry Pi 2.
- Download the Ubuntu image for Pi here
- Extract the zip file
Used this as a guide.
Installation
https://www.youtube.com/watch?v=G2M1Ev_ShP0
Install an enhanced version of dd to show progress bars...
sudo aptitude install -y dcfldd
Insert the SD card, and check which disk Linux sees...
cat /proc/partitions
Extract the downloaded .zip file...
cd /path/to/download/
unzip 2014-06-20-wheezy-raspbian.zip
Now, as root user, run dcfldd instead of the normal dd...
sudo dcfldd bs=4M if=2014-06-20-wheezy-raspbian.img of=/dev/sdb
Customisation With Raspi-Config
Most settings and changes to the system can now be made easily with this new tool called raspi-config.
sudo raspi-config
http://www.raspberrypi.org/documentation/configuration/raspi-config.md
First Boot With Windows Generated SD-Card
The first screen on boot up gives you various options, one of which is to resize the OS to use all of the SD-Card. Do this, then set keyboard, locale etc continue through until you are at a point where you can reboot the system.
PiVPN
HOWTO: MODIFY:
Disable LOADS IN ONE GO
Towards the bottom of this page ...
https://www.cnx-software.com/2021/12/09/raspberry-pi-zero-2-w-power-consumption/
Lowering Raspberry Pi Zero 2 W power consumption
Let go back to the Raspberry Pi OS Lite image with only UART and SSH enabled and nothing else at 125 mA idled. We’ll make some modifications to try to lower the power consumption mostly via raspi-config utility and editing config.txt.
Let’s force Raspberry Pi RP3A0 to 600 MHz.
arm_freq=600
I don’t expect improvements here while idle… and indeed we’ve got 127 mA somehow. Let’s disable the GPU completely by setting the memory to 16:
gpu_mem=16
Still 127 mA on average at idle….
We can disable LED in theory by adding the following lines in config.txt:
# Disable the ACT LED on the Pi Zero.
dtparam=act_led_trigger=none
dtparam=act_led_activelow=on
But it’s not working for me whether I set the second line to off or on. But I can turn off the LED manually from the command line:
$ echo none | sudo tee /sys/class/leds/led0/trigger
$ echo 1 | sudo tee /sys/class/leds/led0/brightness
It shaves 1mA to 126 mA, or about 5mW. What’s very odd is that sometimes I have to run the following instead to turn the LED off:
$ echo 0 | sudo tee /sys/class/leds/led0/brightness
Let’s now disable audio, WiFi and Bluetooth, and camera/display auto detects in config.txt:
# Disable audio (loads snd_bcm2835)
dtparam=audio=off
dtoverlay=disable-bt
dtoverlay=disable-wifi

# Automatically stop overlays for detected cameras
camera_auto_detect=0

# Automatically stop overlays for detected DSI displays
display_auto_detect=0
We are down to 114 mA, instead of 125 mA when we first ran the image without modifications, i.e. default settings including no WiFi, but SSH and UART enabled. That’s a small saving of 9 mA.
Another trick is to disable HDMI with the following command:
/usr/bin/tvservice -o
But it’s not working apparently because of the new standard KMS video driver for 3D graphics in Raspberry Pi OS Bullseye:
/usr/bin/tvservice -o
/usr/bin/tvservice is not supported when using the vc4-kms-v3d driver.
Similar features are available with standard linux tools such as modetest from libdrm-tests.
We can go to raspi-config to change that, namely in "Advanced options->GL driver", where it will install some packages, and then we can select "G1 Legacy".
raspi-config G1 Legacy
It will change config.txt from:
# Enable DRM VC4 V3D driver
dtoverlay=vc4-kms-v3d
max_framebuffers=2
to
# Enable DRM VC4 V3D driver
#dtoverlay=vc4-kms-v3d
max_framebuffers=2
Now we are talking! The power consumption went down to 92.7mA, or about 21mA less, and we’ve yet to disable HDMI output:
/usr/bin/tvservice -o
Powering off HDMI
That’s down to 75.5 mA, another ~17 mA. If you want to disable HDMI automatically at boot time add the line to /etc/rc.local file. That’s also where I ended up turning off the LED (just don’t ask me why I don’t need to run the line to set it to 0 or 1):
# Print the IP address
_IP=$(hostname -I) || true
if [ "$_IP" ]; then
  printf "My IP address is %s\n" "$_IP"
fi
/usr/bin/tvservice -o
echo none | sudo tee /sys/class/leds/led0/trigger

exit 0
We’ve got one more trick that will probably not lower idle power consumption much, but Jeff Geerlink provided instructions to disable cores, so let’s modify /boot/cmdline.txt to limit the number of cores to one with maxcpus=1:
console=serial0,115200 console=tty1 maxcpus=1 root=PARTUUID=9105aa44-02 rootfstype=ext4 fsck.repair=yes rootwait
Disable CPU Cores
Add the following to your /boot/cmdline.txt
maxcpus=1
HDMI Output
# Uncomment to force a specific HDMI mode (this will force VGA).
#hdmi_group=2 # (Monitor)
#hdmi_mode=82 # (Monitor - Acer Full HD)
hdmi_group=1 # (TV)
hdmi_mode=31 # (TV - JVC 1080p 50Hz)
https://www.raspberrypi.org/documentation/configuration/config-txt/video.md
https://www.childs.be/blog/post/raspberry-pi-3-hdmi-overscan-settings-and-how-to-correct-them
Disable Bluetooth
Edit the config file ...
sudo nano /boot/config.txt

# Disable Bluetooth
dtoverlay=disable-bt
Then disable system services ...
sudo systemctl disable hciuart.service
sudo systemctl disable bluealsa.service
sudo systemctl disable bluetooth.service
Then reboot to apply the changes ...
sudo reboot
Disable Audio
Tweaks
- disable swap
- log to ram
Log2RAM
sudo -i
echo "deb http://packages.azlux.fr/debian/ buster main" | sudo tee /etc/apt/sources.list.d/azlux.list
wget -qO - https://azlux.fr/repo.gpg.key | sudo apt-key add -
apt-get update
apt-get install log2ram
sudo reboot
https://ideaheap.com/2013/07/stopping-sd-card-corruption-on-a-raspberry-pi/
Firmware
A firmware update will allow you to boot from a USB drive instead of a micro SD card for speed improvements...
https://www.tomshardware.com/how-to/boot-raspberry-pi-4-usb
NOTES
Update EEPROM
sudo dietpi-config - advanced - eeprom
https://dietpi.com/phpbb/viewtopic.php?f=15&t=8190
Command Line Aliases
Open a terminal and edit the .bashrc file:
Terminal:~$

nano ~/.bashrc
Edit or add the following lines:
nano

alias egrep='egrep --color=auto'
alias fgrep='fgrep --color=auto'
alias get='get_iplayer/get_iplayer'
alias grep='grep --color=auto'
alias install='sudo apt-get install'
alias l='ls -CF'
alias la='ls -A'
alias ll='ls -lah'
alias ls='ls --color=auto'
alias myip='curl ifconfig.me'
alias ping='ping -c3 -n -i 0.2 -W1'
alias pingg='ping www.google.co.uk'
alias pingp='ping www.paully.co.uk'
alias rav='rsync -a -v'
alias remove='sudo apt-get autoremove'
alias rm='rm -iv'
alias search='sudo apt-cache search'
alias update='sudo apt-get update'
alias upgrade='sudo apt-get upgrade'
alias uu='sudo apt-get update && sudo apt-get upgrade'
alias uuf='sudo apt-get update && sudo apt-get dist-upgrade'
CTRL+O then CTRL+X to save and close the file.
Reload the file:
Linux Terminal:~$

source ~/.bashrc

confirm the entries

alias
INFO
neofetch
Verify Network Interface Card NIC Speed
sudo ethtool eth0 | grep Speed
Default Username & Password - Debian
Username: pi
Password: raspberry
Default Username & Password - DietPi
Username: root
Password: dietpi
Default Username & Password - Ubuntu
Username: ubuntu
Password: ubuntu
Default Username & Password - Other Distros
FAQ and other resources
http://www.raspbmc.com/wiki/user/frequently-asked-questions/
http://simonthepiman.com/beginners_guide_to_raspberry_pi_unix.php
http://www.raspberrypi-tutorials.co.uk/set-raspberry-pi-wireless-network/
HOWTO: INSTALL
Docker
Engine
sudo -i
curl -sSL https://get.docker.com | sh
sudo usermod -aG docker username
sudo reboot
docker version
docker run hello-world
Portainer
sudo docker pull portainer/portainer-ce:latest
sudo docker run -d -p 9000:9000 --name=portainer --restart=always -v /var/run/docker.sock:/var/run/docker.sock -v portainer_data:/data portainer/portainer-ce:latest
SMART Monitoring Tools Without Dependencies
sudo apt-get -y install --no-install-recommends smartmontools
FFMPEG with GPU support for Raspberry Pi
Using the following script will install and configure FFMPEG GPU support on your Pi3 / 4 device ready for transcoding.
#!/bin/bash

# example: ffmpeg -c:v h264_mmal -i http://a.files.bbci.co.uk/media/live/manifesto/audio_video/simulcast/hls/uk/abr_tv/ak/bbc_parliament.m3u8 -c:v h264_omx -c:a copy -b:v 1500k output.mp4

echo "Installing FFMPEG with GPU support for Raspberry Pi"

cd /root

sudo -y apt-get update
sudo -y apt-get install autoconf automake build-essential libass-dev libfreetype6-dev \
libsdl1.2-dev libtheora-dev libtool libva-dev libvdpau-dev libvorbis-dev libxcb1-dev libxcb-shm0-dev \
libxcb-xfixes0-dev pkg-config texinfo zlib1g-dev

cd ~
git clone https://github.com/ffmpeg/FFMpeg --depth 1

cd ~/FFMpeg
./configure --enable-gpl --enable-nonfree --enable-mmal --enable-omx --enable-omx-rpi
make -j4
make install

echo "Install should now be complete. Please check the above output for any error messages."

exit;
https://www.worldofiptv.com/threads/raspberry-pi-gpu-transcoding.8664/
Webmin
https://prdownloads.sourceforge.net/webadmin/webmin_1.900_all.deb
https://pimylifeup.com/raspberry-pi-webmin/
MailX
This will install a very minimal (80Kb!) app for sending emails in conjunction with sSMTP, instead of the 8MB of 'mailutils' or 'mutt'.
sudo aptitude install bsd-mailx
You can then pipe a test message...
echo "message" |mail -s "test" you@email.com
Enable SSH Server Headless
- Put the microSD card in the card reader of your computer.
- In your file manager explorer software, click to mount and open the boot partition.
- File > Create Document > Empty File
- Name it 'ssh'
- Click your right mouse button on the partition and choose 'Unmount'.
- Take out the MicroSD Card from the computer.
- Put the MicroSD Card in to the Raspberry Pi and switch on.
When the Raspberry Pi boots, it looks for the ssh file and if it is found, it enables SSH and deletes the file.
https://www.shellhacks.com/raspberry-pi-enable-ssh-headless-without-monitor/
SSH Server
Terminal:~$

sudo raspi-config
Navigate to:
Option 9 - Advanced Options | Option A4 - Enable/Disable remote command line access of your Pi using SSH
Thanks to RaspberyPi.org
Hardware Lister
Linux Terminal $:

sudo apt-get install lshw
Hardware Lister | USB Connected Devices
Linux Terminal $:

sudo apt-get install usbutils
HOWTO: INFO
Boot from NVMe
- Make sd card with pi desktop
- Boot and run apt update and reboot
- Run eprom update and reboot
- Tweak pci gen 3 and reboot
- Download umbrelos
- Run imager and choose nvme for umbrelos
- Run raspi config advanced boot order nvme
- Boot umbrelos on nvme
Disk Imager
Releases
https://github.com/raspberrypi/rpi-imager/releases
Advanced Settings
Press the cog wheel when you are creating an SD card and you can set:-
- hostname
- root password
- ssh service autostart
- wifi details
Disk Speed Tests
sudo curl https://raw.githubusercontent.com/TheRemote/PiBenchmarks/master/Storage.sh | sudo bash
https://jamesachambers.com/raspberry-pi-storage-benchmarks-2019-benchmarking-script/
Change Boot Order
- sudo raspi-config
- Advanced
- Boot Order
Important - you need to REBOOT now, and not just shutdown.
PiKVM
A very simple and fully functional Raspberry Pi-based KVM over IP that you can make with your own hands without any soldering!
This device helps to manage servers or workstations remotely, regardless of the health of the operating system or whether one is installed. You can fix any problem, configure the BIOS, and even reinstall the OS using the virtual CD-ROM or Flash Drive.
https://github.com/pikvm/pikvm#diy-getting-started
Screen Resolution
View current console resolution - probably frame buffer...
fbset
How to set in various methods...
https://pimylifeup.com/raspberry-pi-screen-resolution/
Power Supply Usage
They all need a 5V power supply but the Amp requirements change for each model. This is from personal experience and light non-overclocked usage. I just grabbed one of the many USB power supplies lying around the house and tried them until I didn't get a warning in the error log for 'under voltage detected' or the yellow lightning symbol show on the screen during boot up :-)
- Raspberry Pi 4 Model B = 3A
- Raspberry Pi 3 Model B+ = 2.1A
- Raspberry Pi 3 Model B = 2.1A
- Raspberry Pi 2 Model B = 2.1A
- Raspberry Pi 1 Model B = 1.8A
- Raspberry Pi Zero W = 1.4A
- Raspberry Pi Zero = 1A
LCD Screen
3.5" 320*480 TFT Touch Screen LCD Display Case For Raspberry Pi A B A+ 2B3B3B PM
SD Card Speeds
- Class 4 = 4MB/s
- Class 10 = 10MB/s
https://www.raspberrypi.org/blog/sd-card-speed-test/
sudo apt-get install hdparm
sudo hdparm -tT /dev/mmcblk0
https://ozzmaker.com/how-to-test-the-sd-card-speed-on-your-raspberry-pi/
sudo apt-get install agnostics
cd /usr/share/agnostics && sh sdtest.sh
CPU Stats
https://gist.github.com/ecampidoglio/5009512
Run Script On Boot
https://wiki.indie-it.com/wiki/Ubuntu_Server#Enable_.2Fetc.2Frc.local_on_Ubuntu_20.04
...and then use this for your /etc/rc.local file...
#!/bin/sh -e

# Make sure the SSH host keys have been generated
ssh-keygen -A

# Disable wifi power management
if [ "$(ip address | grep wlan)" ]; then
  iwconfig wlan0 power off
fi

# sleep for 60 seconds to wait for network
/usr/bin/sleep 60s

# send push message on boot
/usr/bin/curl -s --form-string "token=xxxxxxxxxxxxxxxx" --form-string "user=xxxxxxxxxxxxxxxxxxx" --form-string "title=`hostname -f`" --form-string "message=has booted with IP address `hostname -I`" https://api.pushover.net/1/messages.json &>/dev/null

# send email on boot
/usr/bin/echo "booted with IP address `hostname -I`" | /usr/bin/mail -s "`hostname -f`" me@mydomain.co.uk

# exit
exit 0;
Run Script On Boot with DietPi
To run a script on boot, you have plenty possibilities. If you are not too experienced, you can simply put it into /var/lib/dietpi/postboot.d. The DietPi boot scripts will execute it automatically with root permissions then, once the boot process has fully finished, thus network is assured, but BEFORE login/outside the login shell.
Upgrade DietPi to Later Debian Bullseye
https://dietpi.com/blog/?p=811
Change User Passswords on DietPi
dietpi-config > 6 : Security Options > 1 : Change Passwords
Change SSH Server from Dropbear to OpenSSH
dietpi-software > SSH Server
https://dietpi.com/docs/dietpi_tools/
Temperature
sudo vcgencmd measure_temp
Overclock
https://www.zdnet.com/article/how-to-overclock-and-stress-test-your-raspberry-pi/
Stress Test
https://www.zdnet.com/article/how-to-overclock-and-stress-test-your-raspberry-pi/
Model
MODEL=$(tr -d '\0' </proc/device-tree/model); echo "$MODEL"
Display
Check HDMI Port
tvservice -n
https://raspberrypi.stackexchange.com/questions/46153/detect-hdmi-and-start-gui
Discovery
How to find a Raspberry Pi in Microsoft Windows or Mac or Linux...
C:\> arp -a | findstr /i "b8-27-eb dc:a6:32"
$ arp -a | grep -i "b8:27:eb\|dc:a6:32"
$ sudo nmap -sP -r -n 192.168.0.0/24 | egrep -i "b8:27:eb|dc:a6:32|d8:3a:dd" -B2
https://www.shellhacks.com/find-raspberry-pi-ip-on-network-windows-macos-linux/
Reboot On Network Failure
root@raspberrypi:~# cat /etc/cron.d/reboot-on-connection-failure
*/20 * * * * root /usr/bin/host google.com > /dev/null 2>1 || (/usr/bin/logger "Rebooting due to connectivity issue"; /sbin/shutdown -r now)
Cloud Management
Balena
Balena Sound - multiroom audio with Spotify and Bluetooth.
Balena Raspberry Pi Cloud Management
Bluetooth Audio Project
Turn your old speakers or Hi-Fi into Bluetooth receivers with a Raspberry Pi
Video Settings
https://www.raspberrypi.org/documentation/configuration/config-txt/video.md
Console Font Size
Method 1
sudo dpkg-reconfigure console-setup

UTF8 > Guess optimal character set > Terminus > 16×32
https://www.raspberrypi-spy.co.uk/2014/04/how-to-change-the-command-line-font-size/
Method 2
This method involves editing a system file. You just need to load it into your preferred text editor and tweak a few lines :
sudo nano /etc/default/console-setup

FONTFACE="Terminus"
FONTSIZE="16x32"

sudo /etc/init.d/console-setup restart
Reboot On Connection Failure
http://wiki.indie-it.com/wiki/BASH#HOWTO:_Reboot_On_Connection_Failure
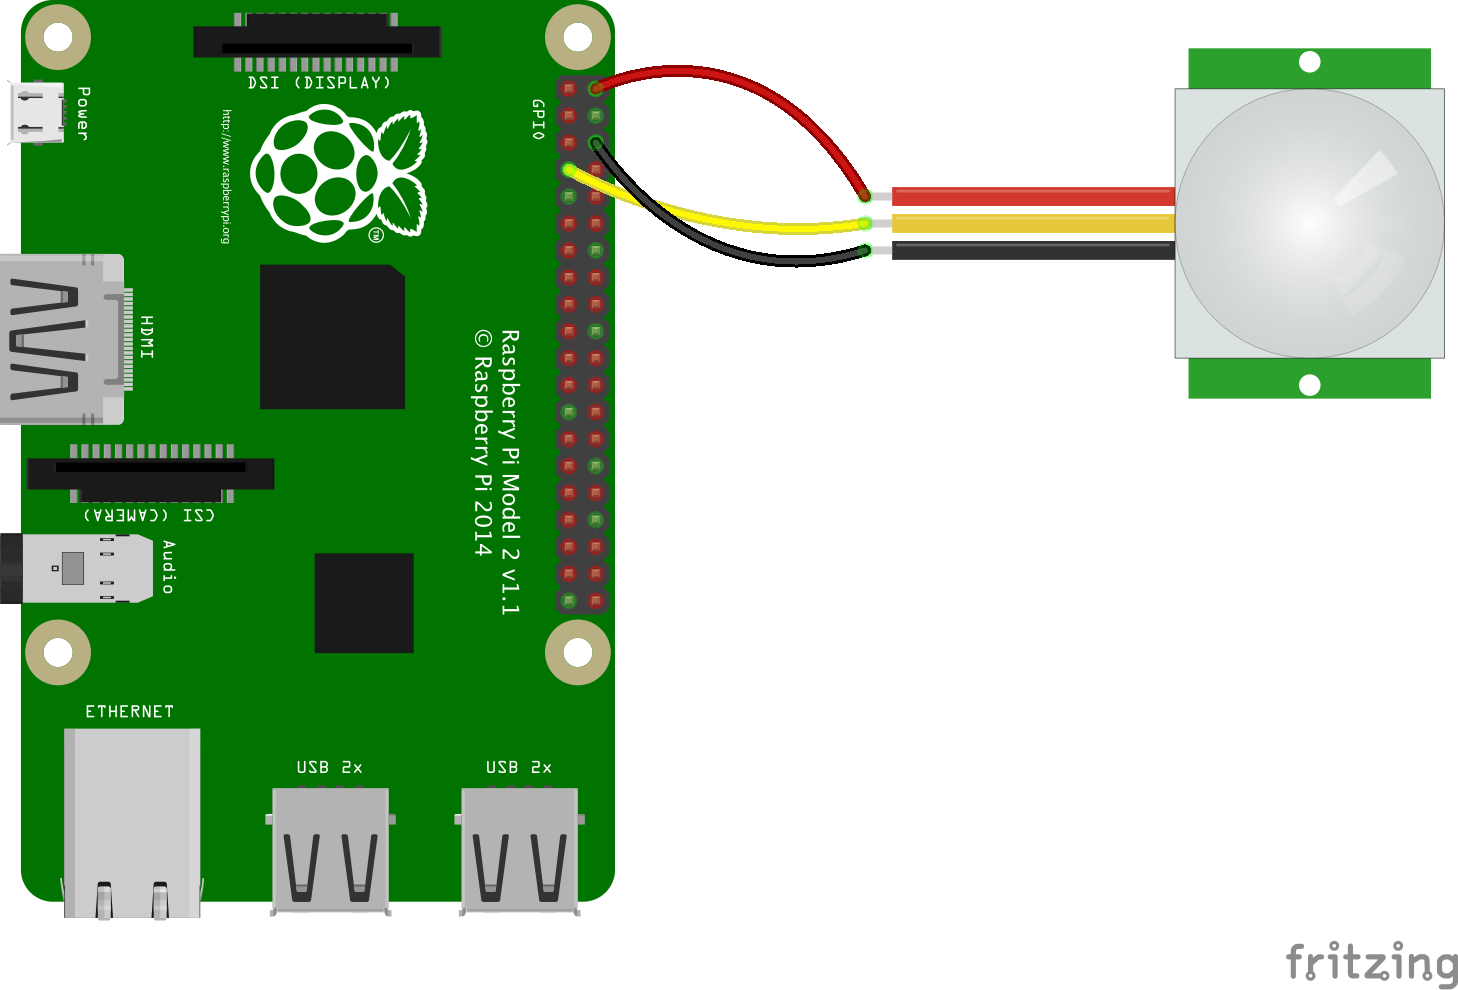
PIR Motion Sensor
Backup SD Card
Install software...
sudo apt-get install gddrescue
Check disk assignment...
sudo lsblk
Perform backup...
sudo ddrescue /dev/sdb raspberry_pi.img raspberry_pi_backup.log
Shrink SD Card Backup Image
NEW SCRIPTED METHOD
UPDATE: 2020-01-05 / ok, so someone has created an awesome script to do all the commands below automatically :-)
https://github.com/Drewsif/PiShrink
wget https://raw.githubusercontent.com/Drewsif/PiShrink/master/pishrink.sh
chmod +x pishrink.sh
sudo mv pishrink.sh /usr/local/bin
sudo pishrink.sh pi_tft_pishrink.img
pishrink.sh v0.1.2
pishrink.sh: Gathering data ...
Creating new /etc/rc.local
pishrink.sh: Checking filesystem ...
rootfs: 114190/467712 files (0.3% non-contiguous), 910213/1873920 blocks
resize2fs 1.45.5 (07-Jan-2020)
pishrink.sh: Shrinking filesystem ...
resize2fs 1.45.5 (07-Jan-2020)
Resizing the filesystem on /dev/loop0 to 935986 (4k) blocks.
Begin pass 2 (max = 37885)
Relocating blocks             XXXXXXXXXXXXXXXXXXXXXXXXXXXXXXXXXXXXXXXX
Begin pass 3 (max = 58)
Scanning inode table          XXXXXXXXXXXXXXXXXXXXXXXXXXXXXXXXXXXXXXXX
Begin pass 4 (max = 9574)
Updating inode references     XXXXXXXXXXXXXXXXXXXXXXXXXXXXXXXXXXXXXXXX
The filesystem on /dev/loop0 is now 935986 (4k) blocks long.
pishrink.sh: Shrinking image ...
pishrink.sh: Shrunk pi_tft_pishrink.img from 7.5G to 3.9G ...
Wow.
OLD MANUAL METHOD
Put the Raspberry Pi SD Card in to your computer using an adapter, then run the following commands to shrink the size of the image file so that you can fit it on to a 4GB or 8GB SD Card :-)
The magic command is 'truncate' but be careful, you have to match that large number to your end sector in the 'fdisk -l' command output...
sudo lsblk
sudo blkid
sudo fdisk -l
sudo ddrescue -f -n /dev/sda pi_zero.img pi_zero.log
cp -av pi_zero.img pi_zero_shrunk.img
file pi_zero_shrunk.img
fdisk -l pi_zero_shrunk.img
sudo modprobe loop
sudo losetup -f
sudo losetup /dev/loop0 pi_zero_shrunk.img
sudo partprobe /dev/loop0
ll /dev/loop0*
sudo apt-get -y install gparted
sudo gparted /dev/loop0
(now shrink your main SD card partition by right-clicking then Resize/Move leaving about 100Mb after the end of the used space for a bit of wiggle room)
sudo sync
sudo losetup -d /dev/loop0
fdisk -l pi_zero_shrunk.img
truncate --size=$[(5789695+1)*512] pi_zero_shrunk.img    (this figure is YOUR sector End number)
ll pi_zero_shrunk.img
file pi_zero_shrunk.img
fdisk -l pi_zero_shrunk.img
Restore SD Card
Check disk assignment...
sudo lsblk
Perform restore...
sudo ddrescue --force raspberry_pi.img /dev/sdb raspberry_pi_restore.log
Expand Filesystem
sudo raspi-config --expand-rootfs
DDRescue-GUI
http://www.hamishmb.altervista.org/html/downloads.php?program_name=ddrescue-gui
Touch Screen Display
Kiosk
To be done...
https://grafana.com/grafana/plugins/yesoreyeram-boomtheme-panel/installation
https://pimylifeup.com/raspberry-pi-kiosk/
https://www.loganmarchione.com/2020/05/always-on-grafana-dashboard-using-raspberry-pi-touchscreen/
DNS Ad Blocking
Install dietpi first, then change the SSH server from 'dropbear' to 'ssh', because this will enable you to use gravity-sync and the ssh environment variables.
Pi-Hole
The Pi-hole® is a DNS sinkhole that protects your devices from unwanted content, without installing any client-side software. It blocks adverts and tracking across your whole network and all your devices.
It is definitely a good idea to have 2 pi-holes and use 'gravity-sync' between them (see above), then back them up using 'ddrescue' every week (just in case the SD card fails)!
Test using a typical (short) blocked domain which should give you an answer of IP address 0.0.0.0 ;-)
host g.live.com
g.live.com has address 0.0.0.0

dig @pihole2 g.live.com
;; ANSWER SECTION:
g.live.com.		2	IN	A	0.0.0.0
;; Query time: 44 msec
;; SERVER: 192.168.0.10#53(192.168.0.10)
Digital Signage
Screenly
The free Open Source Edition (OSE) is now called Anthias and has a new web site!
Installing on Raspbian/Raspberry Pi OS
You can also burn an SD card directly from the Raspberry Pi Imager under 'Other specific-purpose OS' :-)
Installation
- install Raspberry Pi OS Desktop
- run
sudo raspi-configand change System Settings > Boot Console + auto login pi user - configure console font with
sudo dpkg-reconfigure console-setupfor Terminus 16x32 - check/etc/default/console-setup - reboot to check font size
- run command to install Screenly and reboot...
bash <(curl -sL https://www.screenly.io/install-ose.sh)
- Do you wish to continue > Y
- Press 1 for the Production Branch
- Do you want Screenly to manage your network > N
- Do you wish to perform a full system upgrade > N
- Reboot
Fix WiFi
LATEST - September 2021
It should be using wpa_supplicant, so just edit your /etc/wpa_supplicant/wpa_supplicant.conf file to change the wireless network you want to connect to and make sure you disable the Screenly 'wifi-connect.service' from systemd, then reboot.
sudo systemctl disable wifi-connect.service
sudo nano /etc/wpa_supplicant/wpa_supplicant.conf

ctrl_interface=DIR=/var/run/wpa_supplicant GROUP=netdev
update_config=1
country=GB
network={
  ssid="first_ssid"
  psk="myPass"
  key_mgmt=WPA-PSK
  scan_ssid=1
}
network={
  ssid="2NS_SSID"
  psk="passw0rd"
  key_mgmt=WPA-PSK
}

sudo reboot
OLD
You have to disable the screenly 'wifi-connect' service, then use Network Manager to setup the wifi, then enable the 'wifi-connect' service again. Madness. This is because the wifi-connect service disables the use of the wireless chip.
sudo systemctl disable wifi-connect.service
sudo reboot
sudo nmcli device wifi rescan
sudo nmcli device wifi list
sudo nmcli device wifi connect SSID-Name password wireless-password hidden yes
sudo iwconfig
sudo ipconfig
sudo reboot
sudo systemctl enable wifi-connect.service
sudo reboot
https://github.com/screenly/screenly-ose
https://pimylifeup.com/raspberry-pi-screenly/
https://support.screenly.io/hc/en-us/articles/360042164173-Getting-started-with-Screenly-OSE
Raspberry Slideshow Distribution
http://www.binaryemotions.com/raspberry-slideshow-faq/
Camera
https://projects.raspberrypi.org/en/projects/getting-started-with-picamera
https://www.raspberrypi.org/products/camera-module-v2/
http://www.securipi.co.uk/senior-guardian-project-for-raspberry-pi-with-pir-sensor/
Remote Desktop
Virtual Desktop
:1
This is a second pseudo desktop which is different to the one shown on your connected monitor.
Terminal > raspi-config > Advanced Options > VNC > Enable > Yes
https://www.realvnc.com/en/connect/download/vnc
Actual Desktop
:0
This is the desktop running which is the same one shown on your connected monitor.
This requires an extra add-on to the tiger VNC software called a 'X scraping server'.
x0tigervncserver (hence the :0) is a TigerVNC Server which makes any X display remotely accessible via VNC, TigerVNC or compatible viewers. Unlike Xvnc, it does not create a virtual display. Instead, it just shares an existing X server (typically, that one connected to the physical screen).
sudo apt-get install tigervnc-scraping-server
You will also need the binary called 'vncpasswd' which is part of the 'tigervnc-common' package.
sudo apt-get install tigervnc-common
Via SSH

ssh user@remoteserver -L 5901:127.0.0.1:5901
vinagre vnc://127.0.0.1:5901
https://www.cyberciti.biz/faq/install-and-configure-tigervnc-server-on-ubuntu-18-04/
Virtual Desktop
If your Raspberry Pi is headless (that is, not plugged into a monitor) or embedded in a robot, it’s unlikely to be running a graphical desktop.
VNC Server can run in Virtual Mode to create a resource-efficient virtual desktop on demand, giving you graphical remote access even when there is no actual desktop to remote. This virtual desktop exists only in your Raspberry Pi’s memory.
https://www.realvnc.com/en/connect/docs/raspberry-pi.html#raspberry-pi-virtual
Wake Up TV
https://raspberrypi.stackexchange.com/questions/7054/cec-wake-up-command
Kiosk Mode
pi@raspberrypi:~ $ nano .config/lxsession/LXDE-pi/autostart

@lxpanel --profile LXDE-pi
@pcmanfm --desktop --profile LXDE-pi
@point-rpi
@xset s off
@xset -dpms
@xset s noblank
@/usr/bin/chromium-browser --noerrdialogs --kiosk www.google.co.uk
Thanks - https://www.danpurdy.co.uk/web-development/raspberry-pi-kiosk-screen-tutorial/
Fix Chromium Browser Error - Profile In Use
rm -rfv .config/chromium/Singleton*
sudo reboot
Close Chromium Browser When In Kiosk Mode
Keyboard
ALT+F4
Console
sudo pkill chromium-browser
Automatically Switch Between Browser Tabs Set Interval
sudo apt-get install xdotool unclutter
After the download is finished, open the autostart file (.config/lxsession/LXDE-pi/autostart) and add this line:
@lxterminal --command unclutter & watch -n10 "xdotool search --class --onlyvisible Chromium windowfocus && xdotool key ctrl+Tab F5"
This switches the tabs and refreshes the site every 60 seconds. Save the file and reboot. Now chromium should automatically switch tabs and refresh.
Thanks - https://www.danpurdy.co.uk/web-development/raspberry-pi-kiosk-screen-tutorial/
Autostart Apps On Login
https://raspberrypi.stackexchange.com/questions/8734/execute-script-on-start-up
pi@raspberrypi:~ $ nano .config/lxsession/LXDE-pi/autostart

@lxpanel --profile LXDE-pi
@pcmanfm --desktop --profile LXDE-pi
@point-rpi
@xset s off
@xset -dpms
@xset s noblank
@/usr/bin/chromium-browser --noerrdialogs --kiosk www.google.co.uk
Looping Video Playlist With Omxplayer
omxplayer - http://elinux.org/Omxplayer
Python Script
The indentations below must be there, and yes that last line is indented twice (that's Python for you!).
You can change the extra output options for omxplayer to hdmi but this example is alsa (headphone jack)...
cd /home/pi
nano omxloop.py
#!/usr/bin/python
import sys
import subprocess
import os
import glob
path ='/home/pi/Videos/'
while(1):
  for infile in glob.glob(os.path.join(path, '*.mp4')):
    a = subprocess.call( [ "omxplayer", "-o", "alsa", infile])
chmod +x omxloop.py
./omxloop.py
Thanks - https://gist.github.com/simmogs/6668652
BASH Script
sudo nano ~/videoplayer.sh
#!/bin/sh
# get rid of the cursor so we don't see it when videos are running
setterm -cursor off
# set here the path to the directory containing your videos
VIDEOPATH="/mnt/storage/videos"
# you can normally leave this alone
SERVICE="omxplayer"
# now for our infinite loop!
while true; do
       if ps ax | grep -v grep | grep $SERVICE > /dev/null
       then
       sleep 1;
else
       for entry in $VIDEOPATH/*
       do
               clear
               omxplayer --blank -o hdmi "$entry" > /dev/null
       done
fi
done
chmod +x videoplayer.sh
./videoplayer.sh
Force HDMI Sound Output
sudo nano /boot/config.txt
Either add or uncomment the line hdmi_drive=2 then ctrl-o to write the changes and ctrl-x to exit the nano text editor.
Reboot and the HDMI sound will work.
Turn Off Screensaver Screen Blanking
sudo nano /etc/kbd/config
BLANK_TIME=0
POWERDOWN_TIME=0

sudo nano /etc/xdg/lxsession/LXDE/autostart /etc/xdg/lxsession/LXDE-pi/autostart /home/pi/.config/lxsession/LXDE-pi/autostart
#@xscreensaver
@xset s noblank
@xset s off
@xset -dpms

sudo reboot
Find Distribution Version
sudo apt-get install lsb-release
Usage:
lsb_release -a
Switching To Root
sudo -i
Wireless (Built In) Raspberry Pi3
sudo ifconfig wlan0 up
sudo iwconfig
sudo iwlist wlan0 scan | grep 'SSID'
sudo -i
sudo wpa_passphrase "SSID" "Password" >> /etc/wpa_supplicant/wpa_supplicant.conf
sudo nano /etc/network/interfaces
  allow-hotplug eth0
  iface eth0 inet dhcp
  allow-hotplug wlan0
  iface wlan0 inet dhcp
  wpa-conf /etc/wpa_supplicant/wpa_supplicant.conf
sudo reboot
nmcli Network Config Tool
Check wireless radios...
nmcli radio
List network devices...
nmcli device
Scan wireless networks...
nmcli device wifi rescan
List wireless networks...
nmcli device wifi list
Connect to wireless network...
nmcli device wifi connect SSID-Name password wireless-password
Connect to a hidden wireless network...
nmcli device wifi connect SSID-Name password wireless-password hidden yes
Reboot...
reboot
Check network interfaces...
ifconfig
Connect to a wireless network using command line nmcli
OLD (no longer used)
sudo nano /boot/network.ini
  [wlan0]
  ssid=SSID
  passphrase=hkws8348wf
  mode=dhcp
sudo reboot
sudo reboot (yes twice)
https://github.com/screenly/screenly-ose/releases
Similar To Screenly
nmtui
Wireless Dongle
NEW
sudo iwconfig
sudo iwlist wlan0 scan | grep 'SSID'
sudo -i
sudo wpa_passphrase "SSID" "Password" >> /etc/wpa_supplicant/wpa_supplicant.conf
sudo nano /etc/network/interfaces
  allow-hotplug eth0
  iface eth0 inet dhcp
  allow-hotplug wlan0
  iface wlan0 inet dhcp
  wpa-conf /etc/wpa_supplicant/wpa_supplicant.conf
sudo reboot
OLD
Bus 001 Device 005: ID 148f:5370 Ralink Technology Corp. RT5370 Wireless Adaptor
sudo cp /etc/wpa_supplicant/wpa_supplicant.conf /etc/wpa_supplicant/wpa_supplicant.conf.bak
sudo nano /etc/wpa_supplicant/wpa_supplicant.conf
network={
       ssid="<SSID of your wifi network>"
       psk="<the password for this network>"
}
sudo wpa_action wlan0 stop
sudo ifup wlan0
sudo wpa_cli status
sudo ifconfig
https://www.raspberrypi.org/documentation/configuration/wireless/wireless-cli.md
https://www.modmypi.com/wireless-usb-1n-nano-adaptor-802.11N-wifi-dongle?filter_name=Wireless
https://www.modmypi.com/blog/how-to-set-up-the-ralink-rt5370-wifi-dongle-on-raspian
...
TP-Link TL-WN725N v.1 - Realtek 8188CUS chipset
HOWTO: ALTER:
Disable PULSEAUDIO
Disabling the service doesn't work. You have to also mask it. Run these commands as the regular user 'pi'.
systemctl --user stop pulseaudio.socket
systemctl --user stop pulseaudio.service
systemctl --user disable pulseaudio.socket
systemctl --user disable pulseaudio.service
systemctl --user mask pulseaudio.socket
systemctl --user mask pulseaudio.service
EEPROM
The Eeprom handles the initial boot process and updates are made to fix bugs and make improvements.
For example, the ability to boot from USB or NVMe drives.
You can check whether any updates are available for install by running the following command ...
sudo rpi-eeprom-update
If any available update is there, you can give the following command to update Raspberry Pi EEPROM ...
sudo rpi-eeprom-update -a
After updating the bootloader, you need to restart your device to apply the changes ...
sudo reboot
Disable Quiet Boot
This will allow you to see the kernel loading on boot (which might help with any problems of display, etc.)...
Edit the /boot/cmdline.txt file and remove the entry quiet from the boot line.
Get Proper Flashing Cursor Prompt In Terminal
Edit the /boot/cmdline.txt file and remove the entry vt.global_cursor_default=0 from the boot line.
console=serial0,115200 console=tty1 root=PARTUUID=c44fbb7c-02 rootfstype=ext4 elevator=deadline fsck.repair=yes rootwait quiet splash plymouth.ignore-serial-consoles vt.global_cursor_default=0 quiet init=/lib/systemd/systemd net.ifnames=0
Disable Bluetooth
1. Open /boot/config.txt file...
sudo nano /boot/config.txt
2. Add below, save and close the file...
# Disable Bluetooth
dtoverlay=pi3-disable-bt
3. Disable related services...
sudo systemctl disable hciuart.service
sudo systemctl disable bluealsa.service
sudo systemctl disable bluetooth.service
4. Reboot to apply the changes...
sudo reboot
https://scribles.net/disabling-bluetooth-on-raspberry-pi/
Disable Audio
Add or edit the following line in /boot/config.txt
dtparam=audio=off
Disable IPv6
Edit /etc/sysctl.conf and add these lines to the end ...
net.ipv6.conf.all.disable_ipv6 = 1
net.ipv6.conf.default.disable_ipv6 = 1
net.ipv6.conf.lo.disable_ipv6 = 1
net.ipv6.conf.wlan0.disable_ipv6 = 1
Edit /etc/rc.local and add this on a line just before the 'exit 0' ...
service procps force-restart
The, reboot ...
sudo reboot
Delete Secondary IP Address
For some reason, you might end up with 2 IP addresses for your Pi like this...
link/ether b8:27:eb:50:ec:f4 brd ff:ff:ff:ff:ff:ff
inet 10.0.55.5/24 brd 10.0.55.255 scope global eth0
   valid_lft forever preferred_lft forever
inet 10.0.55.55/24 brd 10.0.55.255 scope global secondary eth0
   valid_lft forever preferred_lft forever
To remove the secondary IP, you need to stop and disable the 'dhcpd' service and then delete the IP. On reboot, you will be left with one.
NOTE - You might need to do this with a keyboard and monitor attached!
sudo update-rc.d dhcpcd disable
sudo service dhcpcd stop
sudo ip addr del %YOURS-SECOND-IP% dev ethX
sudo reboot
Turn Off LEDs
Add the following lines to /boot/config.txt and reboot...
# Disable Ethernet LEDs
dtparam=eth_led0=14
dtparam=eth_led1=14

# Disable the PWR LED
dtparam=pwr_led_trigger=none
dtparam=pwr_led_activelow=off

# Disable the Activity LED
dtparam=act_led_trigger=none
dtparam=act_led_activelow=off
https://www.raspberrypi.org/forums/viewtopic.php?t=149126
Delete User pi
sudo -i
passwd root
useradd -c "Pi User" -d /home/piuser -m -s /bin/bash -U piuser
passwd piuser
gpasswd -a piuser sudo
gpasswd -a piuser adm
delgroup pi sudo
rm -iv /etc/sudoers.d/010_pi-nopasswd
userdel -f -r pi
exit
logout
Harden SSH Server
sudo nano /etc/ssh/sshd_config
  LoginGraceTime 30s
  PermitRootLogin no
  AllowUsers piuser
sudo service sshd restart
Firewall
sudo apt-get update
sudo apt-get install ufw
sudo ufw allow from 192.168.0.0/24 to any port 22 proto tcp
sudo ufw enable
sudo ufw status numbered verbose
SD Card Partition Size
http://elinux.org/RPi_Resize_Flash_Partitions
How To Find Out The Actual SD Card Size
dmesg |grep 'SD'
cd /sys/class/mmc_host/mmc?/mmc?:*
echo "man:$(cat manfid) oem:$(cat oemid) name:$(cat name) hwrev:$(cat hwrev) fwrev:$(cat fwrev)"
Thanks - http://elinux.org/RPi_SD_cards
Font Size In Terminal
sudo dpkg-reconfigure console-setup
- Select text encoding | OK
- Select "Guess optimal character set | OK
- Select "Terminus" | OK
- Select font size | OK
HOWTO: FIX:
Blank Screen After Boot
Take out the SD Card or SSD and mount it somewhere.
Edit the /boot/config.txt file and uncomment the line ...
hdmi_force_hotplug
... then unmount the drive, attach it back to the Pi and boot up.
https://www.reddit.com/r/raspberry_pi/comments/okj33r/solved_raspberry_pi_4_boots_to_black_screen/
Use wpa_cli to scan and connect to a wireless network, then setup a standard wpa_supplicant.conf file.
pi@raspberrypi:~ $ sudo wpa_cli -i wlan0
wpa_cli v2.8-devel
Copyright (c) 2004-2019, Jouni Malinen <j@w1.fi> and contributors
This software may be distributed under the terms of the BSD license.
See README for more details.

Interactive mode

> ADD_NETWORK
0
> SET_NETWORK 0 ssid "MYWIFI"
OK
> SET_NETWORK 0 psk "mYpAsshrase"
OK
> ENABLE_NETWORK 0
OK
<3>CTRL-EVENT-SCAN-STARTED
<3>CTRL-EVENT-SCAN-RESULTS
<3>Trying to associate with SSID 'SMITH3'
> quit

iwconfig
ifconfig
sudo wpa_cli -i wlan0 LIST_NETWORKS
To make this permanent, edit the /etc/wpa_supplicant/wpa_supplicant.conf file and add the lines with your wireless network settings to match.
country=gb
update_config=1
ctrl_interface=/var/run/wpa_supplicant
network={
 scan_ssid=1
 ssid="MyNetworkSSID"
 psk="Pa55w0rd1234"
}
If a wpa_supplicant.conf file is placed into the /boot/ directory, this will be moved to the /etc/wpa_supplicant/ directory the next time the system is booted, overwriting the network settings; this allows a Wifi configuration to be preloaded onto a card from a Windows or other machine that can only see the boot partition.
OMX Player ERROR: Raspberry Pi COMXAudio::Decode Timeout
sudo nano /boot/config
  gpu_mem=128
sudo reboot
Missing Sound On HDMI
https://www.raspberrypi.org/documentation/configuration/audio-config.md
Check DOS VFAT Boot Partition
sudo aptitude install -y dosfstools
sudo fsck.vfat -v -a -t -V -w /dev/mmcblk0p1
sudo reboot
Missing Characters On Either Side Of The Screen
Terminal:~$

sudo nano /boot/config.txt

#disable_overscan=1
overscan_left=30
overscan_right=30
30 is an arbitrary figure, experiment for your own setup.
Hardware Addons
Coral TPU AI - The Coral USB Accelerator from Google is a tiny Edge TPU coprocessor optimised to run TensorFlow Lite, adding powerful AI capabilities to many different host systems, including Raspberry Pi.
HiFiBerry - The HiFiBerry Digi+ is a high-quality S/PDIF output board for the Raspberry Pi. It comes in three different versions, compatible with different Raspberry Pis. The dedicated S/PDIF interface chip supports up to 192kHz/24bit resolution. This will enable you to have DTS passthrough on Plex or Kodi or OpenElec.